Apple Notes started with humble beginnings as a scratchpad of sorts, a place for us to stash some simple text for later. It's received many upgrades over the years, but Apple's latest iPhone software update is a game-changer.
With all the new features for Apple Notes on iOS 17, iPadOS 17, and macOS Sonoma, it may finally be your go-to note-taking app — so you can kick your third-party app to the curb. The upgrades make collaborating on notes even more useful than before, give you more control over fun elements such as stickers, improve the attachments experience, let you create your own wiki-style network of information, and more.
The stable iOS 17/iPadOS 17 releases aren't expected until the fall, but you can try out these new Notes app features first on the iOS 17 Beta or iPadOS 17 Beta.
1. Add Hyperlinks to Text
In the Notes app on macOS, you could always add a hyperlink to a word, phrase, number, or whatever, and it couldn't be easier. Just press Command-K on your keyboard after selecting the text, paste the URL in, and hit "OK." But hyperlinking has always been missing on iOS and iPadOS — until now.
With iOS 17 and iPadOS 17, Notes finally supports creating hyperlinks. It may take you a tiny bit longer to do than on a Mac, but it's still a simple task.
Select the text, then find and select the "Add Link" option from the contextual menu that appears. Paste the URL in the "Link To" field and hit "Done," then you have your hyperlink. Tapping it will open in your preferred browser, and you can long-press it to preview the webpage, add it to your reading list, copy the link, or share it.


2. Link Your Notes Together
Being able to create hyperlinks in Notes on iPhone and iPad is fantastic, but Apple didn't stop there. On iOS 17, iPadOS 17, and macOS Sonoma, you can now use the same process for hyperlinking text to create links to any of your other notes. There are even some cool keyboard tricks to make the process even faster.
Apps like Bear, Evernote, Obsidian, Roam, and Simplenote let you easily link between your notes, some of which support bidirectional note linking for distributed knowledge mapping. But now you can "link your thinking" in Apple Notes too, though you'll have to manually add links between notes if you need backlinks.
You can bond a note link to text just like you can with a URL, but you can also make the link show up with a note icon and the name of the note, which may come in handy at the bottom of your notes for reference, especially if you need to link to multiple notes. Note links are also editable, so you can change between hyperlinked text or a linked note's name whenever you want.


3. Link to Notes That Don't Exist Yet
Continuing with note links, you can use the >> keyboard shortcut on iOS 17, iPadOS 17, and macOS Sonoma to create links to notes that don't exist yet. This is useful if you want to create a network of ideas to break up information and keep individual notes from getting out of control. To do it, type >>, enter the name for the note you want to create, and hit "(+) Create note "[The Note's Name]." Your link is then added, and you can tap it to jump right to the new note.
- Full Guide: How to Create Links to Notes That Don't Exist Yet on iOS 17, iPadOS 17, and macOS Sonoma


4. Add Block Quotes to Text
The formatting tools menu on iOS 17, iPadOS 17, and macOS Sonoma has a new option to add block quotes to your notes. Hit the block quote button before you type or when you're on a line you want to convert to a block quote. It works with all the text types, style options, and lists (including checklists).


5. Flip Through PDFs Without Leaving the Note
Before, you could see only the first page of a PDF included in your note when set to large attachments. To see the rest of the pages, you'd have to open it in Quick Look.
Now, PDFs are full-width, embedded in notes. So, you can flip through an entire PDF immediately without opening it in Quick Look first. You can even open thumbnails to tap or click to jump between pages. Long-press a thumbnail to get the same options as in Quick Look, including rotating, inserting, and deleting pages.


6. Fine-Tune Attachment Views
In previous versions of iOS and iPadOS, you could long-press an attachment in Notes to change its size to a small or large preview, but it would also affect the sizes of other attachment previews in the same note. With iOS 17 and iPadOS 17, you can now change the preview size per attachment in each note.
You can still tap and hold an image and change its size to small or large, but the change only affects that image, not any of the other ones in the note.


However, you can no longer tap and hold a PDF preview in a note to see the same sizing options. Instead, you tap the PDF's name to open more options, including the "View As" tool. And unlike before, PDF previews can now be resized to small, medium, or large rather than just small or large.


If you still want to change the size of all attachments in the current note, select the more options (•••) button, choose "Attachment View," and pick "Set All to Small" or "Set All to Large."


You can also change attachment sizes per item on macOS Sonoma. For PDFs, click the more option (•••) next to the PDF's name, choose "Attachment Display," and pick between small, medium, and large views. For images, right-click them to see the view options.
7. Insert Static or Movable Stickers
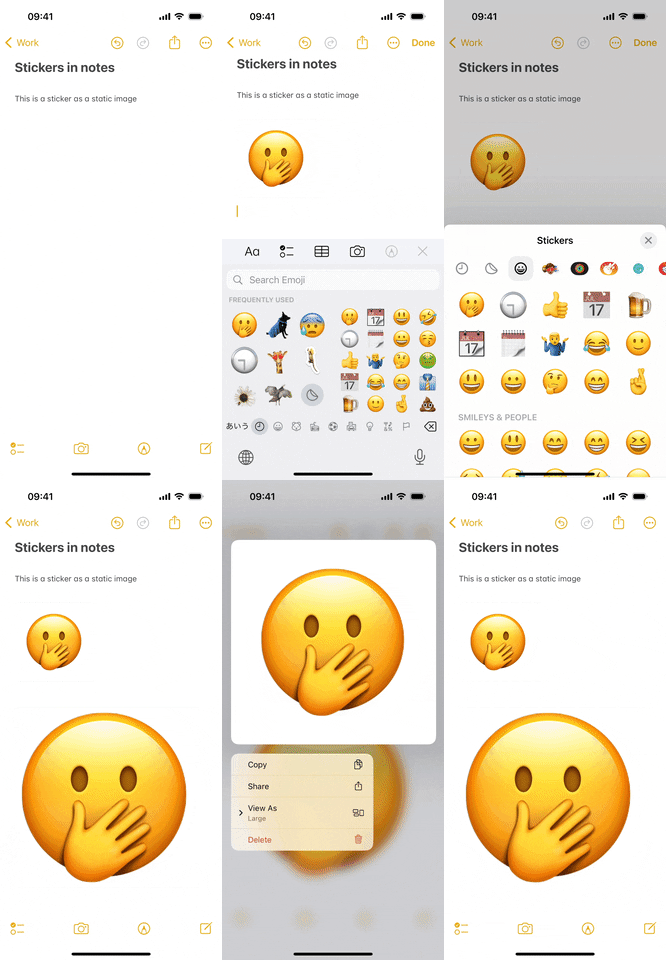
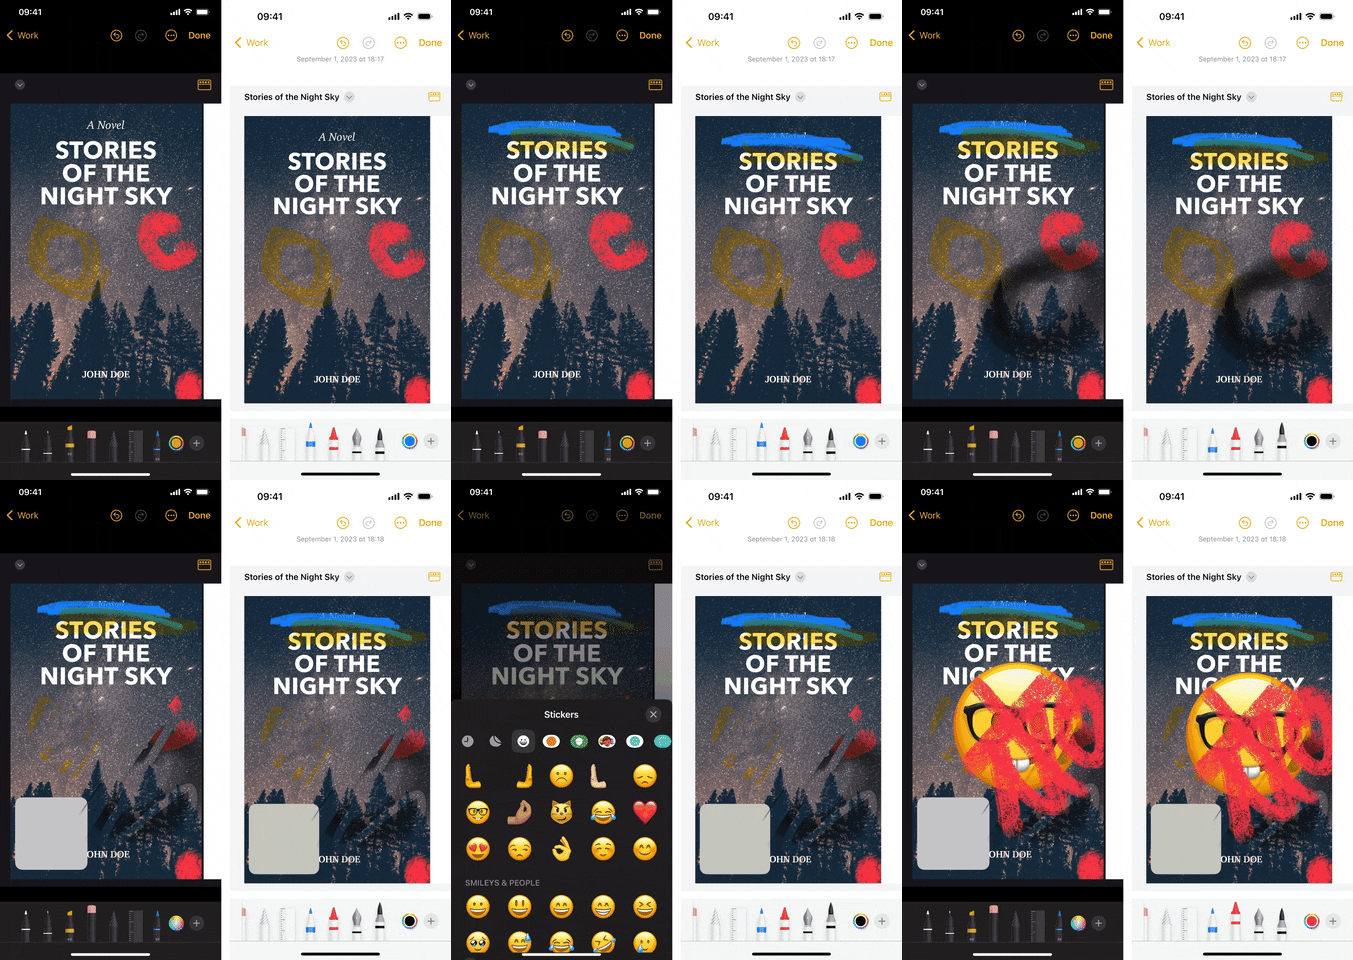
While you could add Memoji Stickers to notes before or paste in stickers manually, things work differently now that Apple has upgraded its Stickers component system-wide. You can now add other stickers from third-party apps, emoji stickers, and even custom-made ones from your own photos — without ever leaving your note.
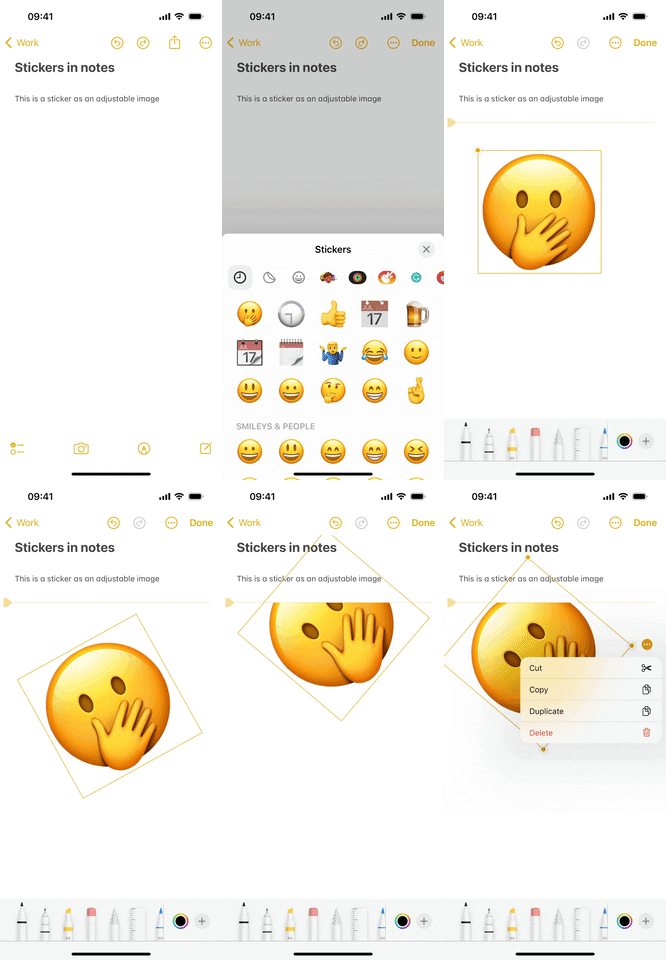
You can still add a Memoji Sticker via the Frequently Used items in your emoji keyboard or paste a sticker into the note manually, and they'll act as a regular image as they did before. But now you can add them to a handwritten sketch where you have more options and control. To do so on iPhone and iPad:
- Place the cursor where you want the sketch.
- Tap the handwriting icon in the toolbar.
- Select the add (+) button from the Markup tools.
- Choose "Add Sticker."
- Tap a sticker to add it — or drag and drop one where you want.
Stickers inserted outside the sketch area will be regular images, while those inside can be moved around. You can drag it around to where you want it, tap a corner and swipe in or out to decrease or increase the size, or place two fingers inside the perimeter and twist to change the orientation. Tap its more button (•••) to get options to cut, copy, duplicate, or delete it. Then hit "Done" to finish.


8. Add Stickers to Photos and PDFs
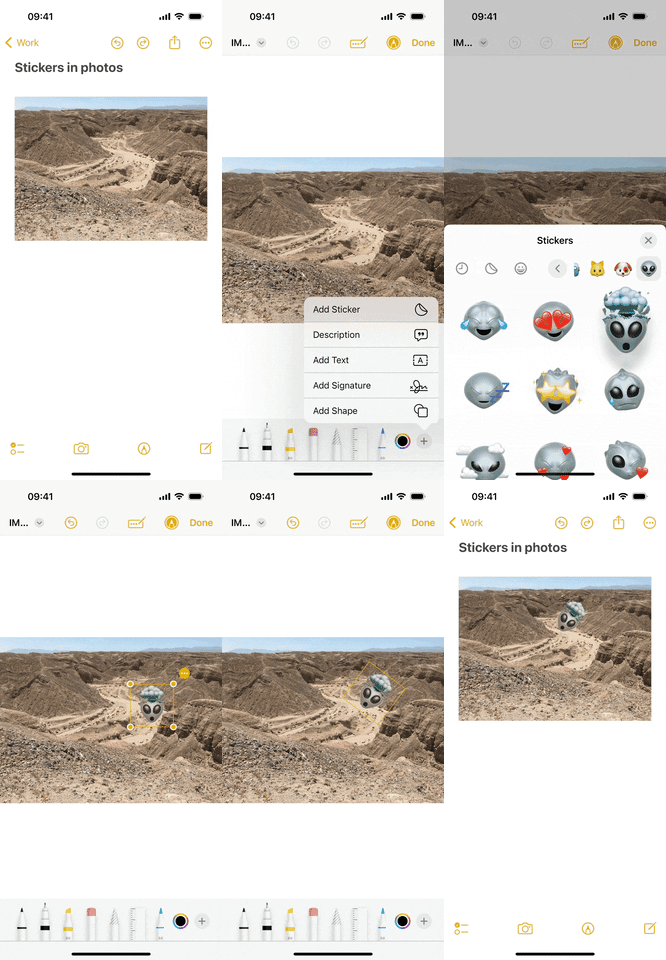
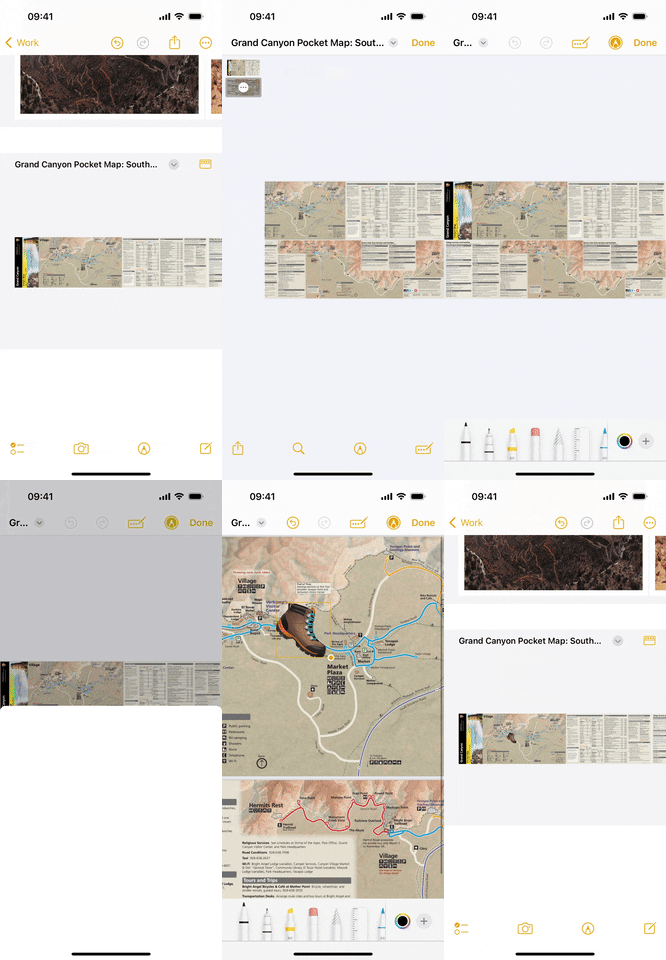
While stickers inside of notes can be fun, you can go one step further by adding stickers to a photo or PDF document on iOS 17 and iPadOS 17. For pictures, you need to tap the image to open it in Quick Look first. For PDFs, you can add stickers in its inline view or tap its name and select "Quick Look."
- Tap the handwriting icon in the toolbar.
- Select the add (+) button from the Markup tools.
- Choose "Add Sticker."
- Tap a sticker to add it — or drag and drop one where you want.
Sticker overlays can be moved around. You can drag it around to where you want it, tap a corner and swipe in or out to decrease or increase the size, or place two fingers inside the perimeter and twist to change the orientation. Tap its more button (•••) to get options to cut, copy, duplicate, or delete it. Then hit "Done" to finish if you're in the Quick Look view.



9. Draw with the Crayon in Markup
The handwriting tools in Notes are great when you want to draw a sketch or would rather handwrite text instead of typing it, and it's equally useful when marking up photos and PDFs. But for some reason, Notes on iOS and iPadOS always omitted the crayon from the writing tools. That changes with iOS 17 and iPadOS 17.


10. Use More Markup Tools in Photos and PDFs
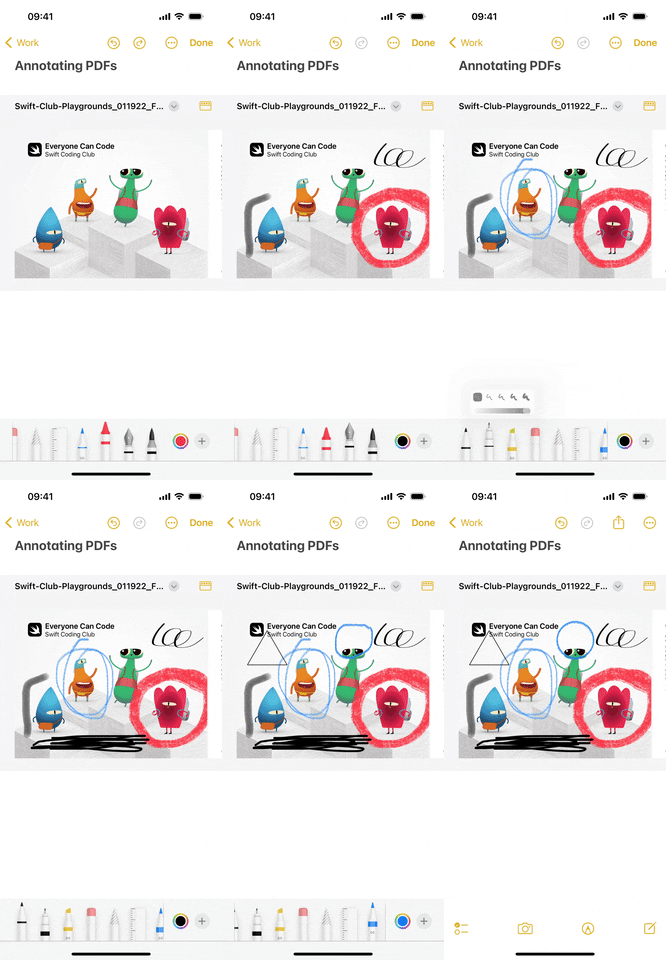
While the crayon writing tool is now available Notes-wide in Markup, other writing tools now appear when annotating images and PDFs. Before, you could use a variable-width pen, highlighter, or pencil on iOS and iPadOS, and that's it. When marking up photos and PDFs on iOS 17 and iPadOS 17, you can also now use a fixed-width pen, crayon, calligraphy pen, or watercolor brush.


11. Annotate Inline PDFs Directly
Expanded on the Markup-related updates in Notes, you can now annotate PDFs directly in a note without opening it with Quick Look, just as you saw in the stickers example above.
So when viewing a PDF preview in the note — as long as the Attachments View is set to medium or large visibility — select the Markup tool and start annotating. You can even jump between annotating the PDF and writing or sketching elsewhere in the note. And you can still use Quick Look if you'd rather scroll through the PDF vertically instead of horizontally.



12. See Edits from Collaborators in Real Time
With everything above and everything you could do before, collaborating on notes with other people is even more impressive now.
You and others in the shared note can edit it simultaneously and have your edits show up in real time for everyone. For example, someone could be typing out a checklist while you're highlighting a PDF and another person is adding photos — and you all would see it on the screen as it happens.
For another example, you could be annotating a PDF in a note on your iPad with an Apple Pencil, circling things that need attention, and another person could be adding stickers, shapes, or photos to the document at the same time. They can then quickly address all your highlights, and you can add notes on top of their images. You could be sitting side by side for in-person collaboration, on opposite sides of the world in bed, or even on a FaceTime call during a meeting.
13. Search Your Notes Better
Searching for PDFs, JPGs, and other file types is more efficient now. Type the file type into the search bar, and you'll see, for example, "PDF Attachments" or "JPG Attachments." Tap that, and it will appear as a filter in the search bar, and you can type a keyword to narrow the results.
Before, searching for a PDF and a keyword would show you Top Hits, Notes, and Attachments in that order. When you use the new filter on iOS 17, iPadOS 17, and macOS Sonoma, it shows up in the same order, but in the Top Hits and Notes results, it should only show notes with an actual file embedded in them instead of "PDF" or "JPG" or whatever typed out in the note or visible in a link.


14. Autofill Content Faster
AutoFill is said to work even faster now — using more data saved to your contacts card — when filling out PDFs inside and outside of Notes. In addition, you'll see an "AutoFill" option in the contextual menu. Tap that, and you'll see new options for "Contact," "Passwords," and "Scan Text." For contacts and passwords, it will open the appropriate picker — choose a contact or account, then select a contact detail or credential to insert automatically.


15. Other Minor Changes to Notes
- The toolbar above the keyboard in notes on iPhone and iPad shifted the table button from the far left to the middle, pushing the format and checklist buttons leftward.
- There are now undo and redo buttons for notes in the top bar on iPhone and iPad, which makes it easy to quickly take or add back any text you've entered without shaking your device or using swipe gestures.
- In portrait orientation on iPhone, the formatting tools (text style, bold, italics, bullets, etc.) pane is shorter, so the buttons appear smaller, and you can see more of your note.
- The "monospaced" typeface in the formatting tools pane on iPhone and iPad is now "monostyled."
- You can now start a note and finish it in Apple Pages. However, this isn't an iOS 17, iPadOS 17, or macOS Sonoma feature like it's been advertised. Instead, it became available in the Pages 13.1 update in the App Store a few months ago, so it also works on iOS 16, iPadOS 16, and macOS Ventura.
- Magnifier seems to be missing from the Markup tools.
- Instead of an icon in the contextual menu for scanning text on iOS 17 and iPadOS 17, you'll see "Scan Text" (which may be hidden behind the new "AutoFill" option).
Cover photo, screenshots, and GIFs by Justin Meyers/Gadget Hacks


Comments
No Comments Exist
Be the first, drop a comment!